
for English, scroll down

Badpakken. Elk jaar opnieuw als het zomerseizoen eraan komt, moet ik effe huiveren aan de gedachte dat het weer van datte is. (En ik ben niet alleen, kijk maar eens naar dit hilarische filmpje ;-)). Voor bikini’s pas ik. Ook al vertel ik aan Sia dat die strepen op m’n buik tijgerstrepen zijn, omdat je tijgerkracht krijgt als je mama wordt, en wilt zij daarom nu al zulke strepen hebben. Ook al weet ik dat ik heus niet te klagen heb met mijn lijf, en dat het heel normaal is om geen platte buik te hebben, al zeker niet na twee zwangerschappen. Enz. Het voelt gewoon niet comfortabel, punt. Een badpak dus. Laat dat nu ook werkelijk geen pretje zijn om te vinden in de winkel. Er is altijd wel iets dat ik niet goed vind. Mijn badpak is intussen 2 jaar oud en gezien het mijn enige was, is het versleten. Tijd voor een nieuw dus. En deze keer een zelfgemaakt! Ik had al een reeks patronen bestudeerd en enkele ervan gekocht, de stoffen had ik ook gekocht. Maar toen kwam daar de drempelvrees. Tot ik een oproepje zag voor een blogtour over zwemkledij, en ik mezelf, door me in te schrijven, een serieuze schop onder mijn kont gaf 🙂
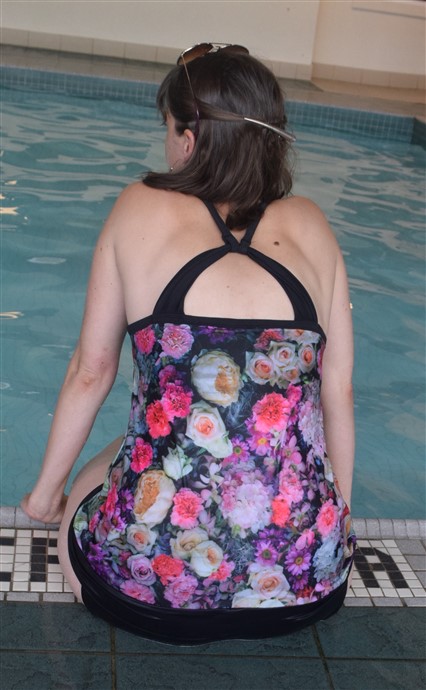
 Ik denk dat ik intussen een viertal patronen voor dames badpakken of zwempakken had gekocht, en het was niet makkelijk om de knoop door te hakken welk ik zou proberen voor een eerste keer. Uiteindelijk werd het de Bahama Mama Blouson Top van Peek-A-Boo Patterns, tesamen met de Bahama Mama Bikini Bottoms. Het leek me niet te moeilijk, ik vind het een erg mooi model, niet in het minst o.w.v. de rug, en het leek me vooral een erg flatterend model, wat ik het belangrijkste vind. Peek-A-Boo Patterns heeft trouwens meerdere zwempatronen voor zowel dames als kids, interessant om een kijkje te nemen. Ik hoop trouwens een van de volgende weken eens terug verder te werken aan mijn miniserie over patronen, want ik ben nog niet ver geraakt met die van de shorts, en daarna wil ik dus nog eentje doen over badpakken ook 😉 Hopelijk lukt het me in juni 😉
 Het is dus geen echt badpak, maar een 2-delige set. De top kan je trouwens ook als ‘gewone’ top, of sporttop maken. Het patroon bevat een ingebouwde bh ter ondersteuning, en je kan desgewenst ook cups toevoegen om wat extra ondersteuning en vorm te geven. Omdat ik niet zeker was hoe dat eruit zou zien bij mij, liet ik ze weg. Ik was wel een beetje bang dat alles dan helemaal plat zou zijn, want ondanks het feit dat mijn cupmaat nog wel hetzelfde is als voordat ik de kids kreeg, is het volume wel drastisch veranderd 😉 Ik moet zeggen dat het inderdaad niet veel overlaat van de resterende vrouwelijke vormen daar, maar toch nog genoeg naar m’n zin en ik vind het vooral belangrijk dat het me goed zit, en niet dat ik er sexy uitzie of zo. Dus ik stoor me er eigenlijk helemaal niet aan.
 Het naaien zelf was toch best een uitdaging. Niet zozeer omwille van het patroon. Ik denk dat dit me waarschijnlijk een pak makkelijker zou afgegaan zijn in een ander type stof, zoals gewone stretch stof. Maar mannekes, zo een zwemstof, dat glijdt! Ik moet dus echt wel benadrukken dat je deze hele blogpost ook echt moet bekijken in dat licht! Oefening baart kunst, en ik heb nog veel oefening nodig! Dit was simpelweg een eerste kennismaking met een heel specifiek type stof. Dat heeft de look van dit kledingstuk echt wel beïnvloed! Naaien doe je trouwens met een gewone stretch naald, en kan zowel met overlock (maar ik moest echt wel best wat zoeken naar de juiste draadspanning en stand! niet gewoon beginnen dus!) als met de naaimachine met stretch- of zigzagsteek. Op internet zijn er tal van artikels te vinden over hoe je best met zwemstof naait trouwens. (bv. hier, hier, hier).

De top zat al bij al relatief vlot in mekaar, maar nu ook echt wel weer niet supersnel. Het had bovendien best nog wat trager gemogen, want ik denk dat ik dan een properder resultaat zou gehad hebben. De instructies waren meestal heel duidelijk. Enkel op sommige punten, zoals het lint met de zwemelastiek eraan om de bovenkant af te werken, moest ik toch goed nadenken. Maar dat had ik eigenlijk kunnen vermijden door gewoon exact de instructies te volgen. Het bias-vormige lint met zwemelastiek erin kreeg ik niet genaaid met de tweelingnaald. Het liep meteen helemaal mis, en ik durfde niet zo verderdoen, dus heb ik al de rest met een zigzagsteek gedaan. Dat ging best vlot, maar soms was het niet helemaal gelijk en dat is iets waar ik bij een volgende keer beter op zou letten. Sommige stukken naaide ik met een stretchsteek. Ik maakte best veel foutjes, waarvan sommige al zichtbaarder zijn dan andere. De topstitching van het bovenstukje aan het voorpand is bijvoorbeeld echt niet mooi. Misschien had ik dat beter een beetje verder van de rand gedaan, en in een gewone rechte steek in plaats van een stretchsteek? Ik durfde het niet uittrekken en opnieuw doen omdat ik bang was dat het dan helemaal een ramp zou zijn.

Ook aan de achterzijde is het niet goed. De rug gaapt en dat stoort me. Ik vond in de handleiding niet meteen terug of ik de elastiek korter moest maken dat het lint, zodat het zou rekken, en deed dat dus niet. Maar het kan ook liggen aan de manier waarop ik de linten eraan heb genaaid, dat dat de rek in het stuk ertussen wegneemt. Of misschien had ik voor de bovenzijde toch een maatje kleiner moeten nemen? Een testversie had misschien wel een goed idee geweest, maar helaas… geen tijd daarvoor!
 Iets wat ik daarnaast nog zou onthouden is dat het driegen/rijgen van de verschillende delen ook best precies moet. Doordat de stof zo gleed, was dat niet altijd het geval, en dacht ik dat dat niet zoveel kwaad zou kunnen, maar achteraf was dat wel het geval, waardoor er nu bijvoorbeeld een plekje is waar de binnen-bh niet helemaal goed vastzit aan de buitenkant. Het is maar een klein stukje, dus niet erg, maar ik had het liever anders gezien. Misschien helpt het trouwens ook wel als je een machine met boventransportvoet hebt of zo.
Qua maat nam ik bovenaan S, en heb ik naar de heupen toe verbreed naar een (ruime) L. Voor de bovenkant denk ik dat XS ook gekund zou hebben. Ik moest de ruglinten flink inkorten en de elastiek-bias-afwerking zit niet overal even strak. Met mijn heupmaat zat ik echt aan de bovenkant van maat L en als er iets was dat ik niet wou, was het wel dat het daar te strak zou zitten. Ik denk echter dat ik toch misschien met een M was weggekomen, want het valt best ruim. Ik heb het ook een 4-tal centimeter ingekort voor ik de heupband eraan zette. Die heb ik ook korter gemaakt, omdat die in maat L niet echt aanspande. Nu spant die net genoeg om niet los te hangen maar toch ook niet te strak te zijn.


Voor het bikinibroekje gebruikte ik ook een patroontje van Peek-A-Boo Patterns. Dit is maat L en zat eigenlijk meteen goed. Het patroon bevat ook de optie om er een echt hoge broek van te maken, maar ik koos voor de lage versie, die ik uiteindelijk toch ook net wat te hoog vind. Maar omdat het toch onder de top komt, stoort het me niet. Ik heb de topstitching weggelaten omdat ik bang was dat het net zoals bij de top niet mooi zou zijn, en het omwille van de redelijk brede band ook niet echt noodzakelijk was. Ik vond het goed dat het patroon vermeldde dat je de elastiek best eens nameet rond je benen. Zo kon ik zelf zien hoe strak ik dat wou. Ik hou niet van bubbels onder de elastiekrand omdat die te strak zit, dus dit was ideaal.

De stofjes kocht ik trouwens beiden online bij Michael Levine Fabrics. Hier in Amerika vind je echt heel veel online shops met een grote keuze aan stoffen voor zwempakken, dat vind ik super! Ik was meteen verliefd op deze bloemenprint, en heb er nog meer dan genoeg van over voor nog een ander badpak! Wie weet heb ik de smaak wel te pakken 😉

CONCLUSIE: Dit alles gezegd zijnde, kan ik alleen maar zeggen dat ik echt heel erg tevreden ben met dit zwem-ensemble. Er zitten een pak schoonheidsfoutjes in, en ja, het kon veel beter. Maar voor een allereerste keer naaien met deze stof, vind ik dit verdienstelijk. En belangrijker dan al die foutjes, is dat ik me er goed in voel. Ik vind dat het me echt flatteert. Zien jullie een buikje? Ikke niet. Zien jullie die love handles? Ikke niet. De lichaamszone die ik zelf altijd wat wil verdoezelen, wordt hier echt effectief verdoezeld. En het zit nog goed ook, niks dat schuurt of niks waar ik na elke plons aan moet trekken. Het naaiproces zelf was omwille van die glibberige stofjes niet het leukste, maar het resultaat geeft me veel voldoening. Ook Lode vindt het echt mooi, en dat is voor mij toch ook een beetje een graadmeter. Op de pagina van dit patroon zie je trouwens dames van alle lichaamstypes, en ik vind dat dit patroon hen allemaal flatteert. Ik zou het dus echt wel aanraden.

P.S. De tour werd gesponsord door een heleboel supertoffe patroonontwerpers en (online) stoffenwinkels, en dat heeft als voordeel dat er twee serieuze GIVE-AWAYS aan gekoppeld zijn! Alle info daarover kan je terugvinden in de blogs van de organisatoren van deze blogtour, Karly and Tami. Zij maakten trouwens beiden een heleboel swimsuits voor het hele gezin, echt de moeite om allemaal te lezen! Deelnemen aan de give-aways kan zo: een eerste is voor iedereen, door mee te doen aan de Rafflecopter giveaway. Een tweede is eigenlijk een link-up, waaraan je kan meedoen door elk zwemkledingstuk dat je gemaakt hebt sinds begin 2017 in te zenden. Zeker doen! De prijzen zijn de moeite! Let wel: niet elke sponsor geeft ook gratis verzending!
Bedankt dus ook aan alle gulle sponsors die dit mee mogelijk maakten!

Voor de volledigheid vermeld ik even dat Peek-A-Boo Patterns een sponsor was van deze blogtour. Ik had het patroon echter zelf al eerder gekocht, dus ik kan jullie enkel verzekeren dat dit 100% mijn eigen mening is. Wat trouwens ook zeker en vast het geval is voor alle andere deelnemers van deze blogtour. Ik voel me echt wel dankbaar dat ik hieraan mee mocht doen. Zelden las ik zoveel eerlijke, interessante en inspirerende blogposts. Neem dus zeker een kijkje bij de andere deelnemers aan deze tour. Je vindt er tonnen informatie over patronen voor dames, heren, meisjes en jongens, tieners, en ook nog een heleboel tips ook. Dit is het overzicht:
Hosted by Sew Sophie Lynn & Paisley Roots
Monday: Pear Berry Lane / Inspinration / It’s Liesel / Sewing For Four
Tuesday: Harper Lu / Call Ajaire / Stylin Stacy / Skirt Fixation
Wednesday: Sewing By Ti / Sewing With Sarah / Sew & Tell / Me Made
Thursday: Made By Melli / Life Sew Savory / That’s What She Crafted / Auschick
Friday: Rebel & Malice / EYMM / Stitching & Making / Lilliepawillie
Follow (bloglovin)
Een reactie maakt mij altijd blij!
patroon/pattern:
Bahama Mama Blouson Top – Peek-a-Boo Pattern Shop
Bahama Mama Bikini Bottoms – Peek-a-Boo Pattern Shop
stof/fabric:
Flowers – Michael Levine Fabrics
solid black – Michael Levine Fabrics
Swimsuits. Every year when summer is coming, I shudder a bit with the thought alone. And I’m not alone, looking at this hilarious little movie 😉 Since a few years I don’t like to wear bikini’s anymore. I just don’t feel comfortable anymore in them… Even though I know I don’t really have to complain about my body… Even though I tell Sia those ‘stripes’ (stretch marks) on my belly are tiger stripes because when become a mom you get ‘tigerpower’ 😉 (which isn’t a lie, is it?), and she already looks forward to having those stripes herself. And I obviously also know that not having a flat tummy, especially after 2 babies, is completely normal. But well, it’s just what it is, and I feel more comfortable in a swimsuit. But finding a well fitting suit is always such an issue! I never seem to find something I completely like. My swimsuit is already 2 years old and has been used a lot, so it was time for a new one, and this time I wanted to make it myself. I had studied some patterns and bought some of them, I purchased the fabrics and supplies. And then came the threshold fear. But luckily I saw an invitation to join this swimwear blogtour, and by registering for it, I gave myself the little push I needed 😉
I think I had bought about 4 swimsuit patterns (oops…addicted, me?) so I had a hard time choosing which one I’d try first. I finally decided on the Bahama Mama Blouson Top by Peek-A-Boo Patterns, together with the Bahama Mama Bikini Bottoms. It didn’t seem to be too difficult, I like the design and especially the back, and most important, I really find it a very flattering look. Peek-A-Boo Patterns by the way has several good swimsuit patterns for both ladies and kids, so it’s definitely interesting to go and have a look. And I’m also still working on my mini series about interesting patterns (here the first post about pants/trousers) where I will do a post about swimsuit patterns as well. But I didn’t make much progress on the shorts, so I still need some time… 😉
This one is not really a one-piece swimsuit, it consists of 2 separate patterns. The top can also be made as a sports or even regular top. It has a built-in bra for support, and there is an option to add cups for extra support and shape. Because I wasn’t sure how that would look, I decided not to add those, even though I was a little afraid that there wouldn’t be any female forms left. I still have the same cup size as before having 2 kids, but the volume has -ahum- *slightly* changed 😉 I must say it indeed doesn’t leave much shape, so maybe the foam cups would have been a good idea, but I actually do not mind that much. I find it way more important that I feel good in it and it fits me well, than whether or not I look sexy 😉
Sewing swimwear can be done with a stretch needle, and can be done with both the serger or the sewing machine, although I had to try a lot before finding the right tension at my serger. There are luckily a lot of articles to be found online on sewing swimwear, like for example here, here, or here. And in this tour you will definitely be able to find lots of advice as well!
The sewing process itself was quite challenging. Not because of the pattern. I think it would have been way easier in another type of fabric, like regular jersey. But man, this swim fabric is soooo slippery!! So I really want to stress very much that you have to see this whole post in the light of me being a complete newbie to sewing with swim fabric and making swimsuits! It was my first introduction to it, and that defines the look of this swimsuit very much! Please do remember that when you read this and look at the pictures 😉 Because I made more than enough mistakes, as you can see and read…
All in all the top was put together relatively smooth, although it was not a very quick sew for me. I think I should have been even slower, in order to have a more neat result. The instructions were mostly very clear. Only at some points, such as the bias finishing of the top, I needed to think hard, partly because I had no experience with it. But then again, when I just did exactly what was written, it worked out fine. When I wanted to try sewing with the twin needle over the bias-covered elastic finishing, it went immediately wrong, and I didn’t dare to continue, so did all the other sewing with a zigzag stitch. That went fine, but for a next time I want to do it more neat, because now not all the stitches look equal. Just a detail, but still. I did some parts with the stretch stitch too, but preferred the zigzag stitch.
I made a lot of mistakes, some big ones and some small ones, some visible and some not. The topstitching of the front yoke is an example of a very visible one. I think I should not have used a stretch stitch there, or otherwise maybe had to topstitch a little further from the side. Or maybe I have stretched the fabric while topstitching it. I don’t really know and it kind of bothers me, but I didn’t dare to take the thread out to do it over again because that might have ruined it and I didn’t want to take that chance.
Also the back is not done well enough. It is too loose between the straps, and that also bothers me a bit when I see it, but luckily I don’t feel it and it doesn’t affect how I wear it. I don’t know what caused this. This was the little part of the instructions that was rather unclear for me, as I didn’t know if I had to stretch the elastic so I didn’t. But I don’t think that is it. Maybe I should have taken a smaller size, or maybe it has to do with the way I attached the straps, causing the piece of elastic in between to lose ts stretch.
A muslin would have been a good idea, I would have known better what to do and how, but unfortunately I didn’t have time for that, as usual.
Something I will also remember for a next time, is that basting the pieces together also needs to be done precisely. Because the fabric was so slippery, it constantly seemed to be slipping away, causing the basting to be less precise on some spots. I thought it wouldn’t matter too much, but afterwards noticed it did, because of the finishing. Now there is for example a little piece of the inner bra that is not stitched together completely to the outside. It’s just a very, very small spot, and it doesn’t really matter while I wear it, but it could have been done better.
Based on the measurement tables, I picked size S on the chest, and widened to size L, almost XL in the hips. In retrospect I should probably not have done that, and might have been good with size XS at the chest and maybe even a size M at the hips. I had to shorten all the straps quite a bit, and as I said, the bias is not everywhere as tight as should be. At the hips I cut off about 4 cm of length (about 1,5″), and I shortened the waistband, because it was too loose. Now it is just tight enough to hold the piece up, but not too loose at the same time, and that is exactly how I wanted it to be.
For the bottoms I also used a pattern of Peek-A-Boo. I took size L and the fit is right on. I didn’t have to do any adjustments. The bottoms also have an option to have a high waist, but I preferred to low waist, and even think it still is rather high. But because it comes under the top, that doesn’t bother me at all. I also didn’t topstitch the bottoms, as I was afraid of having the same effect as the top front yoke, and also thought it wouldn’t really be necessary. I want to add that I really liked the suggestion of the pattern to measure the elastic around your leg. That way I could see for myself how tight it would be, and I could pick a length that I myself liked. I dislike it when my underwear or bikini bottoms are too tight, making bumps on my hips, so this was a nice possibility to avoid that.
I bought both fabrics online at Michael Levine Fabrics. Here in the USA you have a lot of online shops with a great selection of swim fabrics for everyone, how great is that! I myself was head over heels for this flowery fabric, and luckily have more than enough left for another swimsuit 😉
CONCLUSION: All this being said, I can only say I really am very pleased with the swimsuit. There are obviously quite some flaws, and yes, I could have done a better job. But for a very first time, I think this is more than meritorious. And to me, much more important than all my little and big mistakes, is how I feel in this suit. And I feel good in it! Do you see a tummy popping out? I don’t. Do you see my ‘love handles’? I don’t. It takes the attention away from the body zone that I don’t want to be too prominently visible. And it feels good, it fits me well, and even while swimming it still sits well, I don’t have to pull or push some piece up or down again after every splunge. It really makes me happy and I think I will have a lot of pleasure with this one. The sewing process was challenging and not the most fun part, but the result is rewarding. Lode, my husband, also really thinks it is beautiful, that also means something… On the webpage of this particular pattern you can also see how this top looks on several body types, and I think it is flattering to everyone. So I think I can only recommend it.
P.S. The tour was sponsored by a whole bunch of supercool and nice and sweet pattern designers and fabric shops, which has as a big side-effect that there are 2 massive give-aways too! All information about that can be found in the blogs of the organizing ladies Karly and Tami. The first give-away is for everyone, and you can join by simply clicking on this Rafflecopter giveaway. The second give-away consists of a link-up, which you can participate by entering any swimsuit you have made in 2017. The prices are really worth giving that a try! So a very big THANK YOU to all our wonderful sponsors!
To be complete I want to add that however Peek-A-Boo Patterns was a sponsor of this blogtour, I had already purchased the pattern myself, so I can assure you my opinion is completely honest, just as that is the case at all other bloggers in this tour. I have read so many interesting and honest reviews, ideas to alter patterns, etc. that I Really feel so grateful for being able to join and be inspired by so many others. I really hope anyone who reads this will feel as inspired as I do! So please be sure to hop over to the other participants of this tour, where you can find swimwear for ladies, gentlemen, girls, boys, teenagers, ad lots of advice as well!
Hosted by Sew Sophie Lynn & Paisley Roots
Monday: Pear Berry Lane / Inspinration / It’s Liesel / Sewing For Four
Tuesday: Harper Lu / Call Ajaire / Stylin Stacy / Skirt Fixation
Wednesday: Sewing By Ti / Sewing With Sarah / Sew & Tell / Me Made
Thursday: Made By Melli / Life Sew Savory / That’s What She Crafted / Auschick
Friday: Rebel & Malice / EYMM / Stitching & Making / Lilliepawillie
Follow (bloglovin)
Thank you for visiting my blog!
Any comment is of course highly appreciated

Wow, keitof! Zou ik nog niet eens durven, om voor mezelf een badpak te maken ☺ Deze is echt heel geslaagd! En je verhaal over je tijgerstrepen, zalig! Lang leve de tijgermama’s 😉
LikeGeliked door 1 persoon
haha, idd 🙂 en dankjewel! Het was niet echt supermakkelijk, maar ik zou het toch opnieuw doen denk ik, dus misschien toch het overwegen waard? -)
LikeLike
Wow! Wat ontzettend knap!!!!! Hij zit je als gegoten! Ik heb ooit de bombshell van closet case files gemaakt. Een heel eenvoudig model in vergelijking met dit patroon….. Dat topstitchen lijkt mij inderdaad erg tricky op dit soort stof.
LikeGeliked door 1 persoon
ooh, die wilde ik ook keigraag maken, het ging tussen die en deze! Ik denk dat ik die zeker ook ng eens ga maken. Staat de jouwe op je blog? Ik ga eens zoeken 🙂 en dat topstitchen was idd tricky, misschien gaat dat beter bij meer ervaren naaisters…
LikeLike
Hier ook een tankini (= badpak in 2 delen) fan. In een bikini voel ik me ook niet zo comfortabel (‘door tijgerstrepen’ hhaha wat geweldig goed gevonden!). Vorige week nog toevallig gaan zwemmen samen met de dochter. Nog voor ik je logje begon te lezen dacht ik pffeww dat zal wel niet makkelijk zijn met van die badpakkenstof en het wordt hier door jou bevestigd. Des te meer bewondering heb ik dat het jou zo goed gelukt is. Je onderschat jezelf want ik vind het echt wel geslaagd!
LikeGeliked door 1 persoon
dankjewel zeg, wat een superfijne reactie! En ik wist dat het een naam had! Tankini dus 😉 Haha 🙂
LikeLike
Pingback: Let’s sti(c)k together 3 – zon, zee & strand: riley rashguards – Lilliepawillie